Monday, November 26, 2012

DIY Cream Eyeliner


You can always buy the cream eyeliner, but how cool would it be to say that you made your own?!? Pretty awesome!! For the brush, you can use one from your old cream eyeliners or you could purchase some makeup brushes from places like ebay or amazon inexpensively. 

What You'll Need~
Pigmented Black Eyeliner (Preferably cheap since you'll be messing it up)
Empty Container (You can just clean old eye shadow containers or buy the container)
Paper Plate
Plastic Spoon
Something to scrape with
Vaseline/Petroleum Jelly

Step 1~
Start scraping out your desired amount of eye shadow, it can be however much you want, but remember that you'll be using more of the jelly than eye shadow.

Step 2~
Take a spoonful of the jelly (the proportion for this should be 1/3 eye shadow and 2/3 vaseline) and start mixing it together. This can be tricky and messy so be careful.

Step 3~
Once your eyeliner is at a creamy texture, go ahead and scoop the eyeliner into your container.

This project is perfect for stocking stuffers or as a present. Comment if you would like to see a DIY Eye Primer post soon!


Until next time,

~Pearl

Friday, November 23, 2012

DIY Christmas Ornaments!


Hey everyone! I know it's been awhile, I've been busy with pre-Christmas shopping! I will be doing lots of DIY presents for Christmas this year! 
A classic girly-girl trait is to have your own mini Christmas tree. There are many popular themes, white, pink, etc. I thought I would show all of you a way to have your own inexpensive ornaments for your tree.

Materials~
Earrings
Small Christmas Tree
Optional: Plate with jewelry

You can purchase your own miniature Christmas tree at a lot of places. I've had mine since I was a little girl, and it's not very big, but it's perfect for my room! You can purchase a miniature Christmas tree here

To get started go ahead and fluff your tree. To do this you spread out all of your tree's .. um I forgot what they are called but it's what you put the ornaments on! I like to make mine go up a little but that's just me. You can go all crazy with it or you can just pick a theme. I chose white for mine. Now take all of your dangle earrings that match the theme and go ahead and start hanging them! You can make your own by buying the hooks and attaching charms. 

I hope you like your tree! For a cute look, I am going to put my tree in the center of a glass plate and put some of my rings on the plate. 

Until next time,

~Pearl

Saturday, October 27, 2012

3 Ways to Soften Your Lips


Do you deal with dry, cracked lips? Well here are some tried methods (that have worked for me as well) that are sure to soften and moisturize your lips.


1. Take a dry toothbrush and in circle-like motion
scrub your lips. If your lips are cracked, then add some deep 
treatment chap stick before doing this.

2.   Before going to be,  make sure your lips are  lathered up. 
Take your favorite lip balm /chap stick and apply more than usual over 
your lips. If your the skin around your lips are dry, then apply 
a little out there too.


3. This one is a no-brainer. Keep chap stick/lip balm with you at 
ALL times. If you don't wear a purse and don't have pockets in a certain
outfit, then just keep it in the car (you might want to put it under 
some shade so it doesn't melt. Always try to apply it after eating any citrus 
or salty foods. Especially chips.


I hope these three tips help you AND your dry lips! 

Until next time,

~Pearl

Monday, October 22, 2012

DIY Jewelry Display Part 3!


     Hey there girls! Today is the official beginning of the week, so I thought it would be great to have a project to look forward too during this week. As you all know, I have been doing a DIY Jewelry Display series. This last part is probably my favorite. Let's get started!!


What You'll Need~

A small cup (You don't want a cup that's big around, because that could tear your bracelets)
Your stretchy bracelets
Optional: You might want a cute little container or some small jewelry to put on top. I have a container that's perfect for this.
If you have any cups that are the same circumference at the top and the bottom, and they are small enough, you could buy a stand where it could be sideways like the picture above.


Directions~

Step 1-Go ahead and gather your cups and your bracelets. Start at the open part of the cup, set it down upside down to what it was made to stand on, and keep stacking bracelets. If you have smaller bracelets then do them at the bottom (most cups are bigger at the top, so that's why you would want to do smaller bracelets at the bottom). 

Step 2-Now you can add your topper if you have one. Cocktail rings and stud earrings are great for this part. 

Step 3-Now that you've completed your bracelet holder, go ahead and place it where you'd like. I put mine in the middle of my dresser. 


I hope you have all enjoyed this DIY Jewelry Display series! I know I have, because I got to experiment with them :) Another great DIY Jewelry display for your earrings and rings is by a youtube account named Anneorshine. For the link, go here


Until next time,

~Pearl

Saturday, October 20, 2012

DIY Jewelry Display Part 2!


                                Hey there girls! I hope your week has been a great one!
I have been so excited about this new series of mine on DIY Jewelry Displays! Today I am posting the second part to the series. There will be one more part after this! So, here we go!

What You'll Need~
Tacks or Hooks (You can use really pretty and decorative hooks if you would like, but I didn't have any and I am trying to make this series a completely free one!)
Necklaces/Bracelets
An Open Space on Your Wall (I chose a little corner by my dresser that was plain)
Ruler

Directions~

Step 1-This is a really easy DIY, so it won't take long at all. First, you need to get a ruler and insert the tacks or hooks in if you want them a certain way. I chose to make mine a plain line, but I'm going to rearrange it soon!

Step 2-Now you want to take any necklaces or loose and thing bracelets and start hanging. I chose to do a bracelet and a necklace for each tack. (I did about six).


And then-BAM! Your done! This is a super easy way to show off you prettiest and most favorite necklaces but without spending as much money. Stay tuned for the third part of the series!!

Talk you all soon,
~Pearl

Wednesday, October 17, 2012

DIY Jewelry Display Part 1!


     Hey girls! So it's been awhile since I've posted, and I would like to apologize for that. I've been busy with school and brothers, which as you can tell, are a VERY busy mixture! 
     
     I've been wanting to start a series for awhile now, but didn't know what to do it on! Well wait no more, for I have found the PERFECT series!! I was in my room the other day and I had been wanting to buy a spinning earring holder, but I thought it was kind of expensive (If you have 30+ earrings, then I would suggest purchasing this). So, I figured out this inexpensive yet trendy DIY project! Let's get started!


What You'll Need~

1 plate of any kind. I chose glass for mine, but if that doesn't go with your room, then maybe try a pastel or neutral color.
Some Jewelry

Optional: I chose to wrap a strand of pearls around the bottom of my jewelry display, so if you have a long necklace that you can loop around that'd be great. It depends on your preference.


Directions~

Step 1- Go ahead and get your plate. I got mine from a glass sculpture that was coming apart so instead we reused the plates that were on there. If you have a flat bowl instead of a plate, then that would work fine. Just make sure that your jewelry won't slip, since it is a display.

Step 2- Now gather all of your favorite and prettiest smaller jewelry together. I chose some of my earrings, rings, fancy hair clips, and a pretty bracelet for mine. Go ahead and arrange them the way that you want. I liked scattering all of mine out evenly, since I was trying to cover the plate's base, but you can do whatever you like. 

Step 3- If you want to wrap your strand of jewelry around the bottom, go ahead and do that. I just double looped a pearl necklace for mine, since I was going for a more petite, shinier look.


Extra~
If you have just a couple of rings or earrings, then try getting a smaller plate (the bowls used to little dips for a party are great for this also). 


I hope you like your new jewelry display! I encourage you all to try this, because if you already have the plate or flat bowl, than this is a free DIY! I will be doing two more Jewelry Display DIY's soon, so keep watching!


Until next time,

~Pearl


P.S.
Since I still haven't been able to upload pictures, I had to get one off the internet. You can glue a little stand to yours if you would like, but I didn't. 

Wednesday, September 19, 2012

My Favorite Lip Products!


Lately I've seen a lot of "My favorite's" posts and videos, so I thought I would have a go at it with just lips 


Lips
 I recently discovered babylips, and I ADORE them! The only one that I have tried so far is Peach Kiss (purple with orange letters), because my lips have natural color and I look better in lighter colors. It's amazing quality! It moisturizes your lips, and stays on pretty good. The peach kiss also has a shimmer to it, but its not overwhelming. These are basically lip balms, but with a little more style. In my opinion, it combines lip tint, lip stick, and lip balm in one! It's a little pricey, but definitely worth it. I got mine at CVS for $4.17 without tax. I definitely plan on getting more! There is one bad part though, and that would be that they are so amazing you go through them too fast! I would suggest getting more than one :)

I recently got this lip gloss. It's from Mark (by Avon). One of the glosses that I got was  a plumping lip gloss in the color sexy. I also hate using that word but the color is a light pink. The other color that I got was glow baby glow sun luxe. It's a really shimmery color and great for all seasons! I like these lip glosses because they are great quality. Every one that I got has a brush instead of a sponge, and since i prefer brushes, these are the perfect lip glosses for me.  They are kind of pricey though. I got the whole thing for around $13.00. The pink color is like a soft pink rosy color, and the shimmery color is like a light but sparkly peach. I suggest these :)

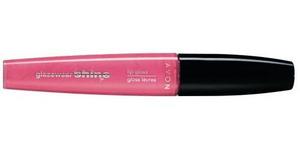
One of my other favorite lip products is this. It's Avon Glazewear Shine in Darling pink. I love the color! Its like a rosy pink on your lips. Plus, I got mine for about $3.00! I just think it's a great lip product. It doesn't stay on quite as good as the other ones, but it sort of tints your lips after the major shine is gone. I just really like this color from Avon!

My favorite plain lip balm right now is Avon's care deeply lip balm with aloe. I like it because it's a great base for lip glosses because it makes the shine and color last longer. Also, I like it because it gives your lips a great looking natural shine. I can definitely feel the aloe in it! I got mine for only $1! It's great because you can buy a couple at a time!
Another favorite lip balm of mine is Avon's pineapple lip balm. It gives your lips a softer and icier look while moisturizing. I don't think it's available anymore, which is why I didn't list it.


By the way, the reason why most of my favorite lip products are from Avon is because my mom used to sell Avon, but the person that she used to work for still gives her all the latest catalogs! So, we get to see the sales before most people!

That's all my favorite lip products! What's yours? I would love to try out some of yall's favorite lip products soon so make sure to comment! :)


Until next time,

~Pearl


Friday, September 7, 2012

I need prayer!

So, I NEVER do this, but I decided that if I write for all of you, you can take a sec and pray for me. My knee is swollen and red and hot, and we think there is infection. Going to Dr. today. PLEASE PLEASE PLEASE pray for God to heal my knee and that the Dr's office will be as painless as possible! This is no joke, I really need everyone's prayer. Spread it on! My family and I are being attacked and we all need prayer.


Thanks guys!

~Pearl 

P.S.
Pearl's not my real name, so in your prayer you can just call me her, or she!


Wednesday, September 5, 2012

Blueberry Banana Smoothie


So, lately in the mornings I have been making smoothies because my brothers kind of take most of the breakfast foods, but that's okay! As long as I have my smoothie, I'm good! I've experimented with several different flavors, but my mom and I are in LOVE with this one! 


What You'll Need~
Blueberry Yogurt
Regular Banana
1 1/2 cup of milk
1/2 cup of sugar (optional)
Ice (optional)

Steps~

1. First you need to stir your yogurt in a bowl.
2. Now you need to slice your banana, so it will be easier to blend.
3. Now you want to add the banana to the bowl.
4. Next, you pour the bowl into the blender, make sure to get all of it.
5. It doesn't matter what order, but put the sugar and the milk in now.
6. I always add ice to mine, to add thickness, but you don't have too.
7. Now blend.

Additional~
If you have real blueberries instead of yogurt, then take the blueberries and mash them first, then add it to the smoothie. Also, if its for a party and stuff, then slice up one banana and use the slices and put them on the cup like they do lemons and limes and oranges. I thought it was a cute idea! ^_^


I hope you like your smoothie! I am actually sipping on mine right now.... -slurp-

Until next time,

~Pearl

Friday, August 31, 2012

The Bow Bun


Hey everyone! I came across this adorable hairstyle today while looking at some hair ideas. The picture is the basic instructions, but I will give you a more detailed set of instructions. By the way, that's not me. I got it off the internet :)

What you will need~
Bobby pins, hair clips, hair tie, hairspray

Step 1~
The first step is to put your hair in  a ponytail. The placement of your ponytail will decide where your bow will be. A classic top of head look is cute, while a side bow is more playful. On your third loop (or your last loop, depending on your hair thickness), pull it halfway through (like the picture), and then stop. You can make it smaller than hers, but I would NOT suggest making it bigger, because that could end up messy. Also, you want to do it backwards, where the excess is in the front. You could do it in the back though.

Step 2~
Now, you want to split the hair. If you have layered hair or shorter hair, then you want to pin it down, because it doesn't lay that way naturally. 

Step 3~
Now, take the excess hair and pull it across the middle and pin it. Spray it with some hairspray if you feel it might not be to stable.

If you have shorter hair, then you could do this look also by just doing the hair from above your temple and up.

Well, I hope you like your new do!

Until next time,

~Pearl


Tuesday, August 21, 2012

My new discovery!


Would you like to know my new creation? Sure ya do! It gives you the results of a salon manicure (with some glam and sparkle) for a LOT less money! I discovered this elegant, chic, but fun combination while my best friend and I were having a sleepover. Here are the directions! 


What you need~
Beige/neutral polish, clear sparkle polish (preferably without stars), clear polish, manicure kit, and anything else you think you might need.

Directions~
First, take you beige/neutral nail polish and do a basic manicure without the top clear coat. After that, add the sparkles! Just one coat should be fine. Then, after it dries, add the top coat so make it smooth! Then, look at your BEAUTIFUL nails! 

This look is great for church, fancy events, or even just a regular day. It goes with pretty much any outfit!


I hope you liked my new nail creation! Until next time,

~Pearl

Friday, August 17, 2012

Oatmeal Facial


Hey everyone! I am so sorry that I haven't posted in awhile, like I said, it has been busy! Today I wanted to give you all a recipe for a great facial. All you need is oatmeal and water!


Basically, the outline of this facial is that you want the oatmeal's milk. A lot of the pieces fall off but that's okay.

Directions~

Get a small cup half full or 1/3 full of oatmeal (it depends on the size of your face I guess), then you can either use a spoon to grind it, or you can do what I do, which is use a food chopper. After it's more powdery, add a little bit of water until it makes a watery paste. Then, you need to cleanse your face before you do the facial. After that go ahead and apply it, and leave it on for 20-60 minutes. after its done, wash it off with a warm wash cloth. I have used this many times and it makes your skin very soft. It works great if you have acne. See, the milk from the oatmeal actually pulls out the impurities from your skin. Make sure you don't do it anymore than once a week, or your skin will become immune to it. 

I hope you all like the facial! Until next time,

Pearl

Monday, July 30, 2012

Hey!

Hey everybody! I am so sorry I haven't posted in awhile. I have had some major surprises that my family and I had to take care of. I promise I will post some more soon! Also, I saw that the only vote said they like hair better than anything else. So, if you would like to vote then just comment and I will try to post accordingly.

~Pearl :)

Thursday, July 19, 2012

How to scrunch your hair!


Hi everyone! Sorry its been so long, I have just been really busy! Sorry about having to use the same picture. I couldn't find a good picture of scrunched hair. So, enough about me, here is the tutorial for how to scrunch your hair!


Tip~ If you have really thick and straight hair (like me), then instead of scrunching, try curling your hair, and then waking up, getting some styling mousse, and lightly scrunching. That way it will hold and look scrunched.


Step 1~
First, you want your hair to be damp. If you don't have time to take a shower, then just run your hands under the faucet, and then run your fingers through your hair. 

Step 2~ 
Put a light amount of mousse or styling gel in your hand.

Step 3~
Start scrunching your hair. 

Step 4~
If you don't like the damp look, then dry your hair (on low) and the scrunch should stay. 


I hope I gave pretty clear instructions. Please comment!

Oh, and feel free to make requests! I will try to open up a chat box where you can put your requests or questions in there.


~Pearl Ivy

Wednesday, July 11, 2012

Scrunched Failure


So, last night I decided that I would try to scrunch my hair. Mainly because I had some free time before we left for my youth group. It went HORRIBLY wrong. It just, did not look good. I used some mousse and scrunched it and one side that was thicker was like straight, and the other had some wave. SO, I would just like to say that if you want to scrunch your hair, then you might want to have longer hair that's parted more in the middle.


I do know HOW to scrunch my hair the right way, its just my hair isn't long enough and its to thick. If you want to scrunch your hair, then I will post a tutorial in the next couple days on how to scrunch your hair the right way.


If you failed at scrunching your hair, like me, then use my tip, put it in a ponytail, poof your bangs, and put on some hoop earrings. I saved my appearance by doing that.


I will post a tutorial in a couple days. Until then, ta-ta!


~Pearl :)

Monday, July 9, 2012

Bad Hair Day Tips


So, everyone has those days when your just won't cooperate or style the right way. I have them quite often actually! I thought that giving you guys some tips would help you when your having one of those days. 


Braid It~
A braid hides any lack of volume, and can hide those bumps that just don't look right in your hair.


Ponytail It~
Put it back in a ponytail. Leave your bangs, or the pieces of hair around the middle top part of your head, and pull it back, twist the end, and poof it up. I always add some hoop earrings to finish the look.


Messy Bun It~
Messy buns are easy, and cute!


Scrunch It~
Take some styling gel and scrunch your hair.


That's all I can think of right now, but I think I will have more in time to come! Have an awesome day :)


~Pearl :)

Saturday, July 7, 2012

Tips for Growing Out Your Bangs


Hey there! So, right now I am in the process of waiting to get my bangs trimmed. But, I have grown out my bangs probably four or five times. In all honesty, it's a VERY hard process! But, I figured that by giving you all some tips, it would be easier for you to get through it. 


Twist Back~
Twirl your bangs back and then keep them there with a clip. Do the opposite side to match!


Braid Back~
You can either french braid, or just do a regular braid. But, you will probably have to stick some bobby pins in the braid because it can get spiky because of all the layers.


Poof Back~
Pull back your bangs, twist the end, then do two clips on each side. Then, kind of poof it forward from the back. I like doing this style with a messy pony tail and some hoop earrings!


Waterfall Braid Back~
Do a waterfall braid with all of your bangs, and then clip it behind your ears. 


Tip~
Because most hair will shape to braids or twists or other things like that, they will stay looking kind of weird when down for awhile. If you don't want them to look like that, then wet your bangs, and put the hair dryer on low and dry them.


I hope I helped with the whole "growing out" process for your bangs!


Ta-ta!


~Pearl :)

Thursday, July 5, 2012

Dressing Up

Dressing Up


Okay, so before I finished packing for camp, I asked my youth pastor if I needed to bring any dresses for chapel. He said that T-Shirts and shorts were fine. So, that's what I packed. When I got there, I realized that there was a pizza bash which you dress up for, and that your not supposed to wear shorts to chapel. Shorts was all I had packed! So, I used a few of these tips to dress up a little bit where I didn't look like I just came from dodgeball.


Shoes~
I borrowed my friends floral sandals for probably three nights. They dressed up my outfit just enough. So, if you don't have any dressy clothes, go for some cute sandals or flats.

Necklaces~
I borrowed my friend's gold owl necklace one night. That worked out great because it gave my outfit a slightly more dressed up look than before. So, try a necklace that goes with your outfit.

Earrings~ 
Its simple, wearing any earrings will dress up your outfit. As long as they are not expanders or whatever they are called, your good. 

Hair~
For me, I just blew dry my hair after I brushed it. Then, I just ran my fingers through it if I wanted to fix it or something. Go natural, or a cute ponytail with a little piece in the front poofed up. Then, tease your ponytail where it looks bigger than it is.

Lips~
In all honesty, I mainly used chapstick. But, if you have more than that, try wearing some glossy lip gloss. It works great.

For the pizza bash thing, I borrowed my friend's dress and my other friend did my eye make-up. Even though I hated the make-up part, my friends did a great job! So, if your somewhere like camp, ask to borrow some of your friend's clothes and other things.

Well, I hope I helped you when it comes to dressing up in a place like camp!


Ta-ta for now!

~Pearl :)


P.S.
Thats basically what I wore, the only difference is my sandals were brown and braided, my hair is straight and just passes my shoulders (with side bangs), and I didn't have my diamond studs with me. The dress I wore also had pockets, and a collar.

Monday, July 2, 2012

Camp Experience


Hey girls! Today, I wanted to talk about some funny things that happened while at camp. Seriously, if you have ever been, it feels like I was there for a month instead of five days! I practically ran to my friends in church, because, I was used to seeing them everyday and living with a bunch. First of all, the bus ride was awesome. Except for the fact that there were some girls that wouldn't stop singing at 4:50 in the morning. Truth be told, we were not very happy with them. Then, I picked out Kung Fu Panda 2 at Redbox for us to watch in the bus (it had TV's, wifi, etc.). Everyone loved it! Then, as we got to the camp, we had to go in for a lice check. They did this awesome video with a bunch of kids swinging their hair to the song I whip my hair back and forth (or however it goes). Then, this bald guy did it. It was hilarious! Then we began the tiring day. Pretty much everyday we had this schedule: wake up, breakfast, morning chapel, team meeting, team activities, lunch, free time, afternoon chapel, free time (rec hall, walks, etc.), then lights out at 12:30 p.m. Every night I stayed out as late as I could, because it was awesome. The rec hall had really good nachos too, by the way. On the last full camp day, they had a pizza bash thing. Then, we all learned that you could bring a date. Well, everyone blew that way out of proportion. It was 20 minutes long. All they did was give you pizza, a coke, and announced the winners. Some kids that came last year said that their pizza bash was way more fun. Finally, we all just walked back up the hill to the lodges. The following stories are all from the pizza bash. I don't wear make-up hardly EVER, and so, my friend wanted to try some eye make-up on me. So, I let her. Thinking, no big deal! Well, she put on mascara, and eye liner, and eye shadow, and gosh, my new word for eye make-up is now gloop. That gloop was not fun. Whenever I went to rub my eye, it felt weird, so I kept rubbing, and my finger came back black. So, I do not think I will be wearing gloop again. If you like it though, that's fine! Another funny thing was that this guy who liked my older friends kept on following them, and so we finally all linked arms to walk down the hill (it was totally platonic, and the girls linked with girls) and we were swaying and just about became a road block. Then, we heard one guy say "Whoa! That dude's got like, four dates!". We all busted out laughing! I basically just danced with my friend, who taught me this awesome swing dance move that I want to show everybody, because its so much fun! I went crazy at that camp :) Oh, and some advice, you find out who are your friends at camp. Because when you are with somebody five days all the time, true colors show my friends. True colors show. But it was awesome!

That's all I can think of right now, but I imagine I will have WAY more to tell later :)

Ta-ta!

~Pearl :)

Sunday, July 1, 2012

I'm Back!


Hey girls! Its been awhile! I was at camp, for those of you that didn't know. I had a blast by the way! It was an amazing time, and I am SOOOO going next year. The funny thing to me is the fact that getting used to "Normal" life is the hardest thing. I am so used to being outdoors all day and constant interaction with kids my age. Have you ever been to camp? Let me know! 


That's all for now, I will post more later!


Ta-ta


~Pearl :)

Sunday, June 24, 2012

French Pedicure


Hi girls! I thought, that since I am leaving for camp at 3:00 in the morning tomorrow, that I could not possibly leave you all hanging and waiting to find out how to do a fantastic French Pedicure! I personally LOVE French Pedicures because whenever my friend comes over, we do it for each other. With normal touch-ups (like, once every 1 1/2 week), they are still in great shape 4 weeks later. Here is the tutorial!


French Pedicure~


Step 1.
First, you need to soak, scrub, file, clip, and put some lotion on your feet! Soak for about ten minutes, scrub your feet, clip/file your toes, then add some lotion to make them soft.


Step 2.
Add two different layers of base coat which is clear. Let dry.


Step 3.
After that, take regular white nail polish and slide it across the top of your nail. I have to warn you though, it takes really good dexterity for you to not mess up once or twice. If you do, just start over on that nail. Don't worry, it took both my friend and I three tries to get the big toes right!


Step 4.
After that, just let it dry. Then, apply a top coat.


I hope you all love your French Pedicure! What are your thoughts? Feel free to comment!


Ta-ta!


~Pearl :)

French Manicure


Hi girls! Today I am going to be talking about French Mani! I love a French Manicure, its always stylish, and goes with ANYTHING! So, here is the tutorial!


French Manicure~


Step 1.
You need to remove any old nail polish, and you need to clean underneath your nails. Also, if your nails have been soaked, push back those cuticles. 


Step 2.
You need to file/clip your nails. I don't like mine that long, so I have a little bit of nail for mine. If you want your nails to remain long, then expect to do a thicker white part. 


Step 3.
Now, apply a base coat. Allow it to dry, then add a second base coat.


Step 4. 
Now take some regular white nail polish and wipe the brush off the sides, and then gently brush it along the top of your nail. Repeat with all nails.


Step 5. 
If you need to touch up, get a cue tip and dab it in some polish remover, then wipe off the parts you don't want.


Step 6.
After its dry, apply a top coat.


Step 7.
Let dry.


And-viola! You have French nails! One thing I would like to say though is that the white part can chip if your not careful, so expect normal touch-ups.


I hope I helped you with your French Nails! I will be doing a post on French Pedicures soon! Oh and, I leave for camp tomorrow at 3:00 in the morning, so I will be gone for 6 days! I can't wait to talk to you all after camp!


Ta-ta for now!


~Pearl :)

Saturday, June 23, 2012

The Nautical Look!

Nautical Meets Polka Dots


Hi girls! Today I wanted to talk about the new trend- Nautical! Before I begin, the outfit above isn't really the ideal nautical outfit, because you usually add red, but I just saw these and thought they made the perfect outfit! So, let's begin! One of the reasons why I like the trend is that it can be totally modest. For example, the other night I wore my new red shoes I told you all about, a navy and white striped thin sweater, some jean shorts (the shirt was tucked in), and a gold necklace and some gold hoops. It was completely modest too! Also, nautical outfits are easy to buy. You don't have to have red pants or the perfect navy and white striped tank, you can mix and match. Like above, I didn't include red because I liked the simplicity that the tan color added to it, don't you? Really all you need are some navy shirts, shorts, dresses, etc. and some gold accessories. Then, if you want to add some red, some shoes, accessories, pants, shorts, etc. would go great. 

Here are some tips~

  • Try to add a pearl necklace or bracelet if you already have one or two gold accessories. If you don't have any gold accessories, then you could just wear pearls! It adds nautical to the outfit because pearls are from the sea, and nautical is based off the sea. 
  • Tennis shoes are okay, but nautical is known for being chic and classy. Try to wear flats instead. 
  • Paint your nails! Navy blue nail polish isn't the easiest to find, and it might not be the same color as your shirts, shorts, etc., but maybe try some red! You can just do the simple manicure if your in a rush. If you don't really want red, then a french manicure or just white polish is great too!
  • You always want to add either gold or pearls, because the nautical colors are SO similar to patriotic that you need to make sure to change it up with those accessories. You can get pearl or gold jewelry for great prices are places like Charlotte Russe. 
  • You can do a cute up-do if your going for a fancier look, but if your going out to lunch or shopping, keep it natural. Just blow dry your hair to make it fluffy, and your good! If you want a little more pizazz, then you can curl your hair and do a cute messy bun with a clip. 

I hope I helped you girls with your nautical outfits! I got a lot of my nautical clothes at Cotton-on, Old Navy, Walmart, Dollar General (shoes), and Charlotte Russe. Thanks for reading!


Ta-ta for now!

~Pearl :)


P.S. 
Just 2 more days until camp, can words even describe my excitement!?!?!? Also, the Dr. said that I am not sick anymore! Thank you Jesus!!!! 

Friday, June 22, 2012

Nail Polish Quiz


Hey girls! Sorry its taken so long to do this! I said that I might do a Nail Polish Quiz to help you find your perfect Nail Polish Color! 


Nail Polish Color Quiz~


1.) Its Saturday, and your mom said that its your turn to do whatever you want today, so you.....


A. Ask to go shopping, to a cafe', or maybe even out with friends.


B. Ask if you can go to the movies, do a crazy game, or go somewhere like a theme park.


C. You ask to go for a walk, bike ride, help in the yard, or just to hang out in your room.


2.) If you could go anywhere in the universe, you would go to.....


A. France, Italy, or the Bahamas!


B. India, China, Turkey, or even Russia!


C. To the Bahamas, or somewhere close to home. 


3.) If you were going out to lunch, you would go to....


A. This cute cafe', or restaurant.


B. An Indian, Chinese, or other foreign restaurant.


C. To a local restaurant.


4.) At the beach you..


A. Either wade in, or sit back and relax.


B. Practically run into the water.


C. Sit back and read a book.


5.) You just got a new haircut, it is.....


A. An adorable long bob, or long and curly/wavy/straight hair.


B. A cute pixie cut, or a lot of layers.


C. You just got a trim, your hair stays the same.


6.) You go shopping for clothes and get...


A. Some skin-toned flats, a cute ruffled floral blouse, and some adorable earrings.


B. A studded vest, some distress jeans, and some neon colored flats.


C. A cute flowy cardigan, a floral top, and some cute tan 1/2 thigh shorts.


Mostly A's~
You are the girly girl. You like looking put together and never sloppy. For you, a french manicure, pastel pink or purple, or maybe even a red would work. For your toes, I suggest a french pedicure (you can actually do that yourself with some regular white nail polish and clear polish). 


Mostly B's~
You are very adventurous and outgoing. For you, a bright red, blue, or even neon colors would work great. For your toes a red or bright blue would work great.


Mostyle C's~
You are the caring, generous, type of girl. You don't like loud clothes, hair, or anything else. Your on the more mellow side. For you, pastel anything would work. Pastel purple, pink, blue, green, etc. Softer colors will really be good for you. For your toes, maybe a lavender or mint color?


I hope you all enjoyed my Nail Polish Quiz! I will be doing a post soon on French mani/pedis so stay tuned!


Ta-ta!


~Pearl :)

Thursday, June 21, 2012

Camp


Hi girls! I just wanted to share with you that I am going to camp this Monday. I will be gone for five days and four nights. I will be able to post on June 30th. I just wanted to tell you all this so you would know that I won't be able to post while I am at a sleepaway camp, because they allow no electronics and I am not known as the rule breaker ;)!


Feel free to comment and request anytime!


Ta-ta for now!


~Pearl :)

DIY Facials


Hi girls! Today I wanted to give you some recipes for wonderful facials. I have tried one, and it works great! Some are for certain skin types so make sure that it works for your skin type. Also, make sure that you have permission to use these ingredients around your house. 

Before I begin, I just want you to know the difference between a facial mask and a facial scrub. A facial mask is like a paste that you spread all over your face and it usually hardens. Then, you wash it off with a warm wash cloth. A facial scrub almost feels like sand. You actually scrub your face with this, but be sure to be gentle because it can irritate your skin if you rub to hard. 

On each facial I do, I will say whether or not it seems like a facial mask, or a facial scrub. 

All Skin Types


Egg White Mask~
All you need is about 1-2 egg whites. Then, whisk until its thinner. After that, gently spread it evenly across your face. This is a facial mask. It dries, and becomes like cracked and stuff. Its actually very hydrating to your skin. I have done this, and I totally recommend it. I have dry skin, and my friend has oily skin, and it worked great on both of us. 

Oatmeal and Yogurt Facial Mask~
Pour one tablespoon of oatmeal into a bowl, make sure its finely ground, then add one tablespoon of organic yogurt. Then, stir a few drops of warm honey into the oatmeal and yogurt. Leave it on for about ten minutes, then take off with a warm wash cloth and put on some light moisturizer. 

Sugar Facial Mask~
Stir together two tablespoons of sugar, and three tablespoons of warm water until it makes a paste-like consistency. Leave it on for about 10-15 minutes and wash off with a warm washcloth.

If you want to see the instructions for a homemade clay mask, then go here.


Oily Skin Types

Banana Facial Mask~
Take one ripe banana, and mix it with a tablespoon of honey. Then, add a few orange or lemon juice drops. Let it sit on your face for about 15 minutes, then wash off with a warm wash cloth.

Aspirin Facial Mask~
Before doing this, be sure that you have your parent's permission because you are going to be handling medicine. Maybe you should ask one of your parents to help you. Depending on how much of your face your going to put it on, you should use around 1-3 aspirin. Roll over aspirin with coffee cup or glass cup to crush it, then put it in a shallow dish. After that you need to stir in a few drops of water to make it into an actual paste. Add some warm honey, and any kind of oil of your choice (almond, olive, etc.). Then, apply to face and leave it until it dries. Then, wash it off with a warm wash cloth. 

Juice Facial Mask~
Mash and blend one teaspoon of lemon juice, 2 egg whites, 3 teaspoons of honey, 1 cup of strawberries, and if you want a few drops of any oil or your choice. Then, apply it to face and wash off after about ten minutes. 

Dry Skin Types

Avocado and Honey Facial Mask~
Take half an avocado, and mash it, then add 1/4 cup of honey. Leave it on for however long, and wash off with a warm wash cloth.

Milk Mask~
Mix together one teaspoon of powdered milk, one teaspoon of aloe vera gel, one tablespoon of warm honey, and 2 drops of essential oil. Leave it on for however long, and wash off with a warm wash cloth.

Sensitive Skin Types

Yogurt Face Mask~
Take one cup of natural yogurt, out of the fridge, and mix it together with 1/2 a cup of ground oatmeal. Leave on for 10-15 minutes, and take off with a washcloth heated in the microwave. 


If you want to brighten your skin, then mix a tablespoon of turmeric powder and 1 cup of yogurt together. Leave it on for 5-10 minutes and rinse off with warm washcloth. (You need your parents permission)


I hope I helped you! I will be posting more spa treatments, like pedicures, and other cool stuff soon!

Ta-ta!

~Pearl :)